Connor McVeen, Claire Dorion, Candace Cronin
Connor McVeen, Claire Dorion and Candace Cronin are recent graduates of the Faculty of Education at Ontario Tech University.
Why coding in Kindergarten?
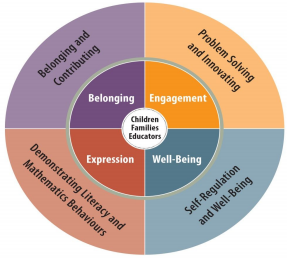
The kindergarten program focuses on students’ development in four main areas; Belonging and Contributing, Self-Regulation and Well-Being, Demonstrating Literacy and Mathematical Behaviours, and Problem Solving and Innovating. Rather than having specific expectations for various academic subject areas, the kindergarten program is meant to develop resourceful, critical, and creative learners.
 Kindergarten is an excellent time to introduce coding as it allows students to develop creative problem-solving skills collaboratively. This can be beneficial in their life skills development as foundational skills of a lifelong journey of working within groups. Active engagement in coding expands students’ ability to think critically and be flexible in their ability to respond to different perspectives. Students need to analyze their own work and the work of their peers to solve problems and create code that works effectively. This can help to build self-aware learners as they are constantly required to evaluate and reflect on their code. The debugging process involved in coding allows students to think collaboratively in a safe learning environment that fosters mathematical and computational thinking. Coding is becoming an increasingly important skill in today’s world, and it goes hand in hand with technological and mathematical literacy.
4 Simple Activities
Activity 1: Introduction to directional arrows & giving instructions
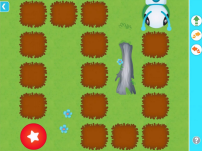
In this first activity, students are first introduced to the concept of coding through utilizing directional arrows as a means of creating an algorithm. The lesson will start with a review of the idea that an arrow shows direction. The teacher can use questioning strategies to ensure understanding. For example, “If I have this arrow, what way is it pointed to?”, or “If I want to go over there, what way should we point the arrow?”.
Once students have become familiar with this concept, progress to using arrows on a grid to create a path. Scaffold this idea by starting with more simple paths, (straight), to incorporating turns. Once this concept has been practiced and is understood, allow students to begin constructing a path to get one object to an ending point, (like a zookeeper trying to get to her toucan). Start with more simple paths and build complexity gradually adding in more turns or obstacles that require the path to move around.
The most common error that will occur with students that are able to understand the concept of using directional arrows to convey direction is the way that they visualize a turn in the path. For some students they will use this visualization:
→→
↑
And others will use this visualization:
↑→
↑
The main difference between the two is how the students see the steps of the pathway. Under the first variation, students see the squares concept as the direction to do when on that square and how to get to the next. On the second variation, students typically see it as how they got to that square from the previous square.
Activity 2: Roll Code
This activity is an extension of the first activity. On a piece of chart paper, there are several different shapes and brown squares. The shapes are targets, and the brown squares are “bad” or “lava” that the students must avoid. The activity starts with a refresher of the previous activity, reviewing that arrows can be used to give directions and make a path from point A to point B. Ask the students to demonstrate once more how to make a turn using arrows on chart paper.
On the chart paper for Activity 2, a “Go” tile will be placed somewhere in the middle. This is where students will begin their path. Students will have a dice that has each of the shapes on it, which when rolled, will decide the shape that students will need to make a path to. Once students have done this a few times successfully, allow them time to challenge themselves. Who can make the longest path? Can you make a path that stops at more than one shape? Students might have their own ideas that they want to explore, and allow time for this. This activity can be done with numbers on the chart instead of shapes.
After students have created a path, allow students to review what they have done before the zookeeper takes the path. This allows students to troubleshoot. If an error is found in the path, students can “debug” the path by tracing their finger along the path, following the arrows. If a mistake is found, students can fix the direction of the arrow and try again. This allows students to develop coding skills and gives them the opportunity to think like a coder.
Some of the common errors that you may encounter include different representations of how to demonstrate a turn, similar to the first activity, as well as that some students may simply ignore the brown “bad” squares. Simply remind them during the “debugging” process that we want to avoid those squares and how they can fix their algorithm to go around it. One last error that some students may do is when changing their path, especially if they decide to go to two shapes, they may not change the old path. For example, if the student is to travel to the Yellow Triangle and then to the Green Diamond, they may make a path that branches to both, not one continuous path to both.
Activity 3: Coding Exploration on the iPads
This next activity moves students from unplugged coding to some plugged coding on the iPads utilizing a few different applications. Two applications were primarily used to allow students to transfer their knowledge from the unplugged activities to these new games: Code-A-Pillar and Code Spark Academy.
The Code-A-Pillar application has students giving directions to the Code-A-Pillar so that it can navigate through a series of different levels. It starts simple, slowly introducing students to new blocks to place in the pathway. Slowly the levels may get a little challenging for some of the
 students as the code becomes longer and new and different obstacles are introduced. For example, one obstacle is a leaf so there exists a block the students have to use that has the Code-A-Pillar eat the leaf. There’s a swim for ponds, a staircase for logs, a shovel for rocks etc. Some of the common errors that may be encountered in this application are the different uses of the arrows, the straight-arrow is now forward so it will rotate in place for the proper direction. The corners now require a specific turn arrow, left or right, and will rotate accordingly to the direction the Code-A-Pillar is travelling. This may throw some students off at first, but with time, most students will be able to overcome this new change.
You can view a video of the application being played here:
https://www.youtube.com/watch?v=v0b-TbfrfEo
And download it on the Google Play store or the Apple App store here:
Google: https://play.google.com/store/apps/details?id=air.fisherprice.com.codeapillarGoogle
Apple: https://apps.apple.com/us/app/think-learn-code-a-pillar/id1110815901 The second application that was used was the Code Spark Academy application, as it was involved in the Hour of Code challenge. This application had several different game modes, some that were locked behind a membership, and some with free use. In this application three different game modes were used: Puzzles, Create, Snoopy Snowbrawl
In the Puzzle mode, students give directions to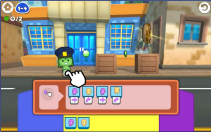 several characters as they navigate a level in search of an object (police officer looking for a donut, construction worker looking for a toolbox). The instructions that students give include a walk and a jump, each able to be changed for a walk left/right, jump left/up/right. The application will also eventually introduce the concept of looping the same instruction. While some students may be able to understand and utilize it, most ignored this feature. One of the most common issues students faced at first was understanding how to change the direction of a command. The command is just a single walk command that students need to tap the arrow of to change the direction. The jump command is a jump left, jump up, jump right. Some students would input a jump up, which just jumps in place, and then a walk right and get stuck as to why the character didn’t jump right up onto the box. Another issue that may be encountered is that the application doesn’t erase the old code while not resetting the starting position of the character. If an error is present and a student fixes it by appending the new code to the existing code, it will execute the old code first with the character where the old code left them off, which can sometimes create a loop of confusion.
In the next mode, Create, students are tasked with playing a game. A game that needs to be finished on certain levels. They guide a monkey character using arrow buttons in a side scroller, Mario-like game to collect gems and reach the big star. In some levels, there are parts of the level missing that students need to fill in, and in others some of the pieces don’t have the code required for the level to function, so students need to give the right code. For example, one level the player is presented with nothing but spikes, but high up top are some builders and boxes. By giving the builders code to move right, they push the boxes on the spikes and the player can safely jump across. After enough levels are cleared, the student can make a completely custom game however they see fit. This mode does help guide the students through the required tasks and is a fun way to implement coding, as many get drawn to the game aspect of it. The free build-a-level some students may be confused what to do in, but with some gentle nudges they often are capable of creating a simple level. The final game mode that CodeSpark offered at the time was called Snoopy Snow Brawl, however, it isn’t always available on the application. This game mode is similar to the Puzzles game mode, only this time you are guiding a Snoopy Scout and trying to get them to defeat an AI opponent in a snowball fight. You code the Snoopy Scouts to walk, jump, and throw through the levels. The first few levels are simple and used as an introduction to the game, and the later levels become more difficult before unlocking a harder version of the game. Most students were able to complete the first level, a few onto the later levels, and one student beat the game. Snoopy’s Snow Brawl has similar issues to the Puzzles in common mistakes students made, as they have to change the direction of the instruction manually.
You can see a video of Snoopy’s Snow Brawl here :
https://www.youtube.com/watch?v=1erdldeLBQw
And you can play CodeSpark Academy on Android or Apple devices as well as play in browser: Google: https://play.google.com/store/apps/details?id=org.codespark.thefoos Apple: https://apps.apple.com/app/id923441570
Web Browser: https://codespark.com/play/
You can access the games by clicking on School in the top right corner, then on students, then on Hour of Code.
Activity 4: Code-A-Pillar In Real Life
The Code-A-Pillar application is just one version of Code-A-Pillar, it’s also a physical object that students can code and play around with. So with the availability of a physical Code-A-Pillar, it was time to move the students to real-life exploration. Thought time was limited, there was some opportunity to observe the students interact with the physical product. This activity is a target activity, requiring students to build the Code-A-Pillar segments, with each segment being an instruction block. This activity is quite exciting for the students as the Code-A-Pillar lights up, plays music, and speaks. As one student exclaimed (with an outdoor voice), it is super cute.
However, the Code-A-Pillar is not as precise as one would hope so it does require some trial and error for the students (and the teacher) to get the Code-A-Pillar to the planned target. This allows for students to have the opportunity to troubleshoot and debug together. Be sure to watch for students that will simply move the target instead of changing the Code-A-Pillar! Overall it’s an excellent collaborative activity that engages the students and gets them thinking like coders.
You can extend the Code-A-Pillar game with more time, by figuring out just how far each segment makes the Code-A-Pillar move and tape out a grid out on the floor or in the hallway to make it less of a guessing game.
You can buy the Code-A-Pillar on Amazon here:
https://www.amazon.ca/Fisher-Price-DKT39-Think-Learn-Code-A-Pillar/dp/B01ASVD2L4
There is a different version called Code-A-Pillar Twist, where instead of attaching code segments, you twist a dial on each segment to code it.
Possible Extensions/ Integration
The four activities outlined above are great ways to start getting kindergarten students to code. Here are some examples of other coding activities that can be done with kindergarten students, and different ways topics may be able to be integrated through coding:
- Unplugged Paired Programming: In these activities students give verbal directions to each other to navigate through something. One student acts as the Driver, the one doing the walking, the other the Navigator, the one supplying directions.
○ FNMI (path to maple syrup taps, finding the nearby water source)
○ Science (guide a an animal to their habitat, Block the vegetable garden from the bunny as a predator, escape the fox as prey)
■ The predator/prey game can even be done in a group of four, where one pair tries to escape the other pair.
○ Phys Ed Partner Code Hopscotch (Guide someone through a hopscotch, or extend it even to an obstacle course of sorts)
○ Lego Sets
■ Coding is essentially giving something step-by-step instructions, and Lego sets are a perfect way to do this, and what kid doesn’t love Lego?
■ One student can direct the other on how to build a certain Lego set and the other builds it. Later they could try and teach other students how to
build their set with their instructions.
- Mathematics Patterning code create (Pick a Pattern i.e A,B pattern)
- Music code by sequence (Colour coded music sequence)
- Phys Ed Twister Colour Code Movement
- Scratch Jr
- Bee Bots
- Blue Bot
- If/Then Backyard Coding Game
○ Every round, one person is the Programmer and the rest of the class are the Computers. The Programmer stands somewhere visible (front of the class if inside), and gives the Computers commands. “If I ______, Then you ______”. For example, “If I turn in a circle, Then you turn in a circle” or, “If I touch my head, Then you touch your nose”