
by Dave Watson – former teacher at TVDSB and Western University
STE(A)M = STEM with the inclusion of The Arts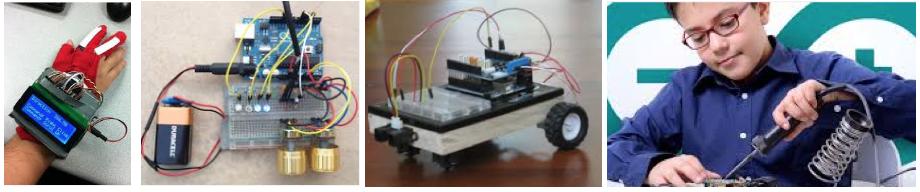
The case for DIY STE(A)M is likely to be driven by limitations in school budgets. As the notion of computational thinking solidifies and is deemed essential in STE(A)M curriculum, schools will need to reset resource acquisition ranging from software used by learners armed with processing capacity to hardware devices designed to function and respond.
 While ‘STEAM’ is an appropriate framework, keep in mind that the drivers of comprehension are somewhat different. Consider the toolkit of mathematical skills and concepts. These lie at the centre of the sciences which in turn allow us to better understand key technological and engineering ideas as we apply them in our environment with great consideration to function. It’s not so much ‘Math, Science and Technology’; it’s ‘Mathematics in Science in Technology’.
Deciding to include a coding element in your program must address some very specific expectations. The means to an end likely has the learner demonstrating competencies at multiple levels within this diagram. Computational thinking becomes a common thread that removes restrictions on the ability to be self-reliant. We teach the basic elements of a programming language in order to achieve a ‘pre-canned’ result, often framed by the teacher. The toolkit need not be a complete abstraction. Freely available and friendly object-oriented programming languages such as MIT’s Scratch environment (https://scratch.mit.edu ) present learners with ‘any time / any place’ programming and remove the usual classroom parameters. Following initial stages, we are presented with a classroom opportunity to laterally build our ideas beyond the graphical display on a screen and the known teacher script. Planning and designing and debugging a program / script / sketch can push a learner’s sophisticated ideas into Science and Technology solutions. Moving beyond the hardware of the computing device necessitates the use of an interface and it is here that a major conundrum surfaces.
Commercial opportunities present themselves in a seemingly endless array; there is no shortage of offerings for educators hoping to move learner experience to new levels. The caveat is the cost factor. With limited budget, acquisition means few children have adequate resources to build a substantive grounding in both coding and the applications leading to the higher-order thinking skills: analysis, synthesis, and evaluation. By example, a LEGO Mindstorm kit suitable for a triad or quad grouping is ~$400. The restriction of time-on-task per learner mitigates the wonderful possibilities of extended coding into applications.
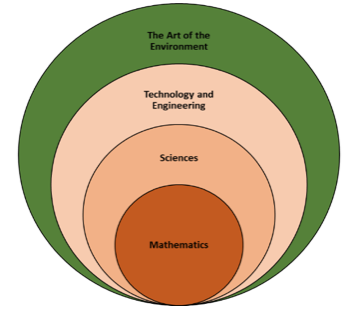
There is another possibility… If one were to cut away the plastic shells and colourful details of commercial apparatus, the core working parts would be revealed to consist of ‘generally’ inexpensive components. LEDs, resistors, simple switches and many other possible elements can be purchased in adequate quantities within a most limited budget. Connected to an interface such as the Arduino Microcontroller (< $20), learners can push boundaries across the spectrum from novice to highly advanced, lending planning a low floor-high ceiling program design. An EV3 LEGO temperature probe costs ~$60.00; a 10K thermistor inserted in a drinking straw with 2 small wires connected to an Arduino impacts you budget <10¢. In both cases, the learner can measure temperature and build a program to respond. When the student constructs and employs the instrument, the depth of comprehension can be exponential.
POINTS TO CONSIDER
What level of computing power is needed?
Any computer with a USB port will function. Older under-utilized workstations have adequate processing capacity to function here.
What Software is needed for to allow the computer to ‘talk’ to the Arduino Microcontroller?
The <Scratch for Arduino> programming language was designed by the <CitilabSmalltalk> group in Spain. ( http://s4a.cat/ ) It is freely available to educators with a provision to assist in further development of the software. Notice how this friendly language grows for a learner’s familiarity with <Scratch> ( https://scratch.mit.edu ). A second option for older learners (Transition Years (12+) and beyond) is <Snap for Arduino> ( http://snap4arduino.org ). Developed at the University of California at Berkeley extends the ability to make more sophisticated use of the Arduino board. Again, there is little to no pressure on budget.
What hardware would be needed?
It is at this stage, that the ‘comfortable world of LEGO –like apparatus seems so appealing. Just snap it together, follow a few printed instructions on a page and expect a high level result. It fits the old adage: a mile wide and an inch deep. I feel very strongly that the learning is too often shallow; yet, a move to this real world endeavor can feel ‘comfortably’ risky, unpredictable, raw and messy.
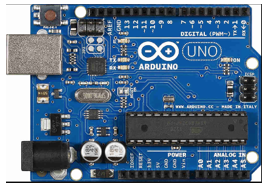
 The Arduino microcontroller: Priced in the $10-$20 range, a class set of 8 is within every class’s reach. USB cables are included.
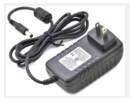
- Arduino Power Supplies: Voltage is always kept < 24 volts for safety reason. External pug-ins are not needed unless project power consumption exceeds low level use. Operating several LEDs poses no issue, but motor operation will need additional energy . Cost is ~$2.00 in surplus stores. (Hint – Just check around your home)
- Parts:
- This will be an interesting aspect. Educational systems can be very restrictive so that a fair and transparent account is maintained. The ‘board approved’ list often provides approved sellers and refrain from open sourcing of educational materials. Do keep in mind that reasonable quantities of devices can be monitored and restricted by set budget lines. A more flexible handling or central supply such as the ‘Port-A-Lab’ system used years ago by TVDSB might deserve a second look.
- Used and discarded consumer electronic products abound; use these to your advantage. Just two weeks ago, I dropped by a recycling station at a Salvation Army Thrift Store. Finding several discarded CD and DVD players, I now have small motors to make a robotic car (used to turn the disks) and small stepper motors to move a robotic arms in and out, around and up/down. (used to move the read/write head of a DVD player) My cost was only the few minutes to disassemble the units, remove the parts and recycle the leftovers. By the way, I’ve never met a student that didn’t like taking the devices apart themselves.)
How might we begin?
- There are many online resources available to educators and grouping you might wish to join. Consider (http://scratched.gse.harvard.edu) and (http://blog.s4a.cat).
- Download one of both of these files if they might be of use.
- I’ve assembled a series of lessons (lesson sequence S4A.pdf) that may be useful. In the sequence, there are basics to help get setup, acquire the software needed and make some project that children replicate so that the teacher can easily track and check competencies as they develop. In each case, there needs to be a breakout point once mastery is demonstrated. While many of these possible routes are indicated, there is no mandatory direction. Let the circumstances determine the route, bearing in mind that lateral development of the skill set is the desired end result.
- A self-contained unit of work (adaptable Grades 6-10) is also available as an add-on. The Micro House is an energy based unit that is very much cross-curricular. In the scope and sequence, learners design a small house in orthographic 2D space, build a paper model in 1:1 scale and structure the house in 2:1 scale, using 1cm x 1cm wooden strips. The exterior walls are ‘insulated’ to make the house envelope energy efficient. The building is then tested and evaluated for heat loss. It is here that the work with the Arduino board and the making of a temperature probe cross. The probe is used to measure the interior temperature of the house every 30 seconds for 15 minutes. The data is plotted and final evaluations are made.